Showing posts with label Vintage Wallpaper embossing folder. Show all posts

Monday, 25 June 2012

Apothecary Art 70th Birthday

Hi everyone, I thought I would share this 70th birthday card with you today. I made this for my mother-in-law's birthday a couple of weeks ago. This card happens to use the Apothecary Art set which we'll be using in class on Wednesday:


Photos never seem to do cards justice but this is an A5 card, using Perfect Plum for the base colour. The strip down the middle is Crumb Cake, embossed using the Vintage Wallpaper embossing folder aand the Big Shot. You can see the embossing in more detail in this photo as well as the '70' which was die cut using the Timeless Type Junior Alphabet, and decorated with pearls.


I used Pink Pirouette for my contrast colour and added a Pretty in Pink bow with one of the beautiful vintage brads in the centre:
I stamped the image from the Apothecary Art stamp set in grey ink and coloured it using ink pads and a blender pen:
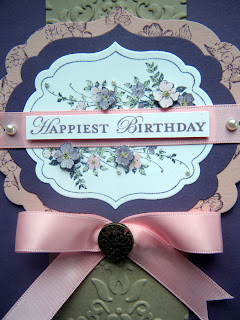
I cut out some of the flowers to 3D them. Fidddly, but worth it I think:

As before the Framelits labels dies match the stamp shapes exactly. I hope you like this card, my mother-in-law did. I'll be showing you the other projects from card class over the next few posts. Check back soon. x 

Tuesday, 14 February 2012

Happy Valentine's Day

Oh dear. Valentine's Day is nearly over and I'm only just posting this. I was planning to do it this morning but I didn't get a minute. Here is the card I made for my husband:

I saw something similar on the internet ages ago but can't remember who made it, so I can't give any credit. This card was made in Cherry Cobbler and Whisper White cardstock. I punched out lots of leaves, using the Bird Builder punch and then drew a heart shape on my card, after I had put it through the Big Shot with the Vintage Wallpaper embossing folder. I then stuck the leaves down, following the heart outline:


I punched 2 birds from Whisper White and very lightly inked the edges with Crumb Cake ink - just enough to make them stand out a bit. I then stamped the sentiment using my new For my Family stamp set. This contains lots of great words which you can use to personalise any card. The sentiment was punched out using the Modern Label punch:

Naturally the card wouldn't have been complete without a reference to Valentine's Day so I used the Valentine's sentiment from the You Are Loved stampset and stamped it on the inside of the card:

Posted by Picasa
I hope you like this card. It could be used for all sorts of occassions, including weddings and the colours could be matched to anniversaries, bridesmaids dresses etc. Remember, if you would like to buy any of the products, just give me a ring. x

Thursday, 13 October 2011

Merry Christmas, Pennant Card

Well, it was card class yesterday and we had a lot of fun. There is so much talking, hardly anyone ever finishes all the projects, despite us always running over. This is the Christmas card we made:


We used Real Red and Very Vanilla cardstock and a strip of the absolutely gorgeous Holly Berry Bouquet designer papers with the matching Real Red satin ribbon. We punched 2 'fluffy' triangles (as people were calling it yesterday), from designer stack dotty paper, using the Petite Pennant Builder punch. The dotty paper on this card was Garden Green. We then glittered all the dots using a glue pen and Dazzling Diamonds. The top triangle was folded in half and stuck to the other using Multi Purpose Liquid Glue. As this glue is latex (rubber) based it stays very flexible, allowing some movement in the layer without coming off.

We cut a circle of Very Vanilla and embossed it using the Vintage Wallpaper embossing folder and the Big Shot. I then used some Crumb Cake ink round the edges. It was all stuck together and the 'Merry Christmas' sentiment was added in Soft Suede ink. This gives a softer look than using black ink. The sentiment is from the Contempto Christmas stamp set.
I have tried to show you the lovely glitter effect on the Holly Berry Bouquet paper, in this photo but it is difficult to tell. Hopefully you can get some idea. These papers are really fabulous and suitable for other occasions too, not just Christmas. If you would like a 6x6 piece of every speciality designer paper in the catalogue, then keep an eye on my blog as I will be announcing a paper share at the launch party on Saturday 15th Oct, and will then put it on the blog. If you would like to come to the launch party, it is not too late to book your place, so please contact me ASAP. 

I'm having a whole day off work tomorrow to craft and get ready for various events so I should have lots to show you soon. So, keep checking back for more information and more pictures of projects.x                                                                                                                                    Posted by Picasa

Monday, 12 September 2011

Christmas in September

Hi Everyone, I know some of you have been wanting to see photos of the Christmas class which is happening on Wednesday. Unfortunately the class is now full but I am planning to hold an all day Christmas class in November, so check back for final details. I’m hoping to finalise the arrangements this week.
This is what we’ll be making on Wednesday:

The gorgeous Jolly Holiday papers are retiring in September and they are actually sold out now. Luckily I had enough for the class. However, you can make these cards just as easily with the new Christmas papers coming out on 1st October. They are lovely, so check back on the 1st October when I’ll post a link to the new catalogue, or order your copy now – see the button on the side bar.

Here are some close-ups of the cards. The stamp set Contempto Christmas is only £15.95 for the wooden set or £12.95 for the clear set. It’s a very versatile set and has a matching Ornament punch so making cards, gift boxes, tags and all sorts of decorations couldn’t be easier.


The Christmas tree branch was stamped with the Lovely as a Tree stampset and here you can see the 3D effect of the baubles after I punched them out with the ornament punch.

Here's the next one. I used the Vintage Wallpaper embossing folder on the background after I cut it with My Big Shot, using the Top Note die.


Here are some close ups of the embossing done with the Vintage Wallpaper folder.


I used the fabulous mini milk carton die in the Big Shot to make this cute little container. These make great gift boxes or can be filled with sweets, chocolates etc. I love these and they are so easy so we'll probably making lots of these in future projects.


I used the 5 petal Flower Punch to make the poinsettia.


If you want to make any of these projects yourself, contact me for the supplies you need or join me in another Christmas class later in the year. Take care. x
Posted by Picasa
Supplies used:
Cardstock: Old Olive, Cherry Cobbler, Very Vanilla
Papers: Jolly Holiday
Stamp sets: Lovely as a Tree, Contempto Christmas
Punches: Ornament punch, Modern Label, 5 Petal Flower, Oval Scallop
Other: Big Shot, Top Note die, Mini Milk Carton die, Vintage Wallpaper embossing folder