Showing posts with label Mini Milk Carton die. Show all posts

Friday, 16 March 2012

Owl party

Hi everyone. Where has the time gone? This week has flown by. Everyone had a great time on Tuesday making their Mother's Day cards and Flip Album and I will show you pictures of that later. I've got  something a little bit different to show you this morning. I found some very cute little owl lip balm pots in my local shop and they immediately made me think of the very similar colours of Stampin' Up! cardstock. So I bought them and made little boxes for them, ready to sell at a fair I'm doing on saturday. I then realised I had a similar coloured owl money box and so grouped them all together for a 'party' photo:


The colours I used are Melon Mambo and Concorde Crush and for the other set (you can just see them peeking out of their boxes), Island Indigo and Lucky Limeade. Here's a better view of the flowers on top of the boxes and the little owls:


The boxes were made using the Mini Milk Carton die and the Big Shot and the lids were cut and scored by hand and then punched using the Scallop Trim Border punch. To get the small box shape, you only die cut the bottom half of the mini milk carton. The flowers on top of the boxes were cut using the Flowers, Daisies die and the Big Shot again:
 
Posted by PicasaI hope you like these and that it shows you just how versatile the dies can be. Ofcourse, I am working on a matching card but haven't finished it yet as I've been busy making things for the fair, so, watch out for the card later. If you would like to come and see me at the Beeston Fair, it's being held at the Pearson Centre in Beeston, 10.30-4.00pm on Saturday 17th March. Have a great day. x

Wednesday, 14 December 2011

Santa gift box

Hi everyone. Sorry for the delay in posting the things we made at our last card class. I've not been well, but now feel a bit better so can go on my computer again. This is the santa gift box we made. I love this. Such a clever idea (not mine, I saw various versions on the internet). I'm sure we'll make it again though, using different colours and papers. Here you go:


Believe it or not the box is made from the Mini Milk Carton die, using the Big Shot to cut it. If you google 'mini milk carton box' and click on 'video' then you'll get several youtube videos showing you how to put it together. That will be much easier than me trying to explain it. I used Real Red cardstock for the box and a 1" strip of Basic Black for santa's belt. I cut 1" from the end of the belt to place in the middle of the silver square. The silver square was punched using the 1 1/4" square punch. A couple of pearls act as buttons.
I punched holes in the top 'pleats' using my Crop-a-dile, and threaded 1/8 Real Red Taffeta Ribbon through the holes. Hopefully you can see how I did it here:


As you can see the white ruffle was made using Whisper White card and the new Dotted Scallop Ribbon Border punch. Everybody in the class did a great job of making the box. If you fancy having a go and need any of the products, just let me know.

The Christmas cards will be posted soon, promise. keep checking. x
Posted by Picasa

Friday, 11 November 2011

Advent calender kit

Apologies (again) for having not blogged for a while. This is my first Stampin' Up! Christmas and I can't believe how hectic it is. There seem to be so many Fairs to go to, as well as classes and parties. Not that I'm complaining mind you, it's good to be out there spreading the Stamping word...

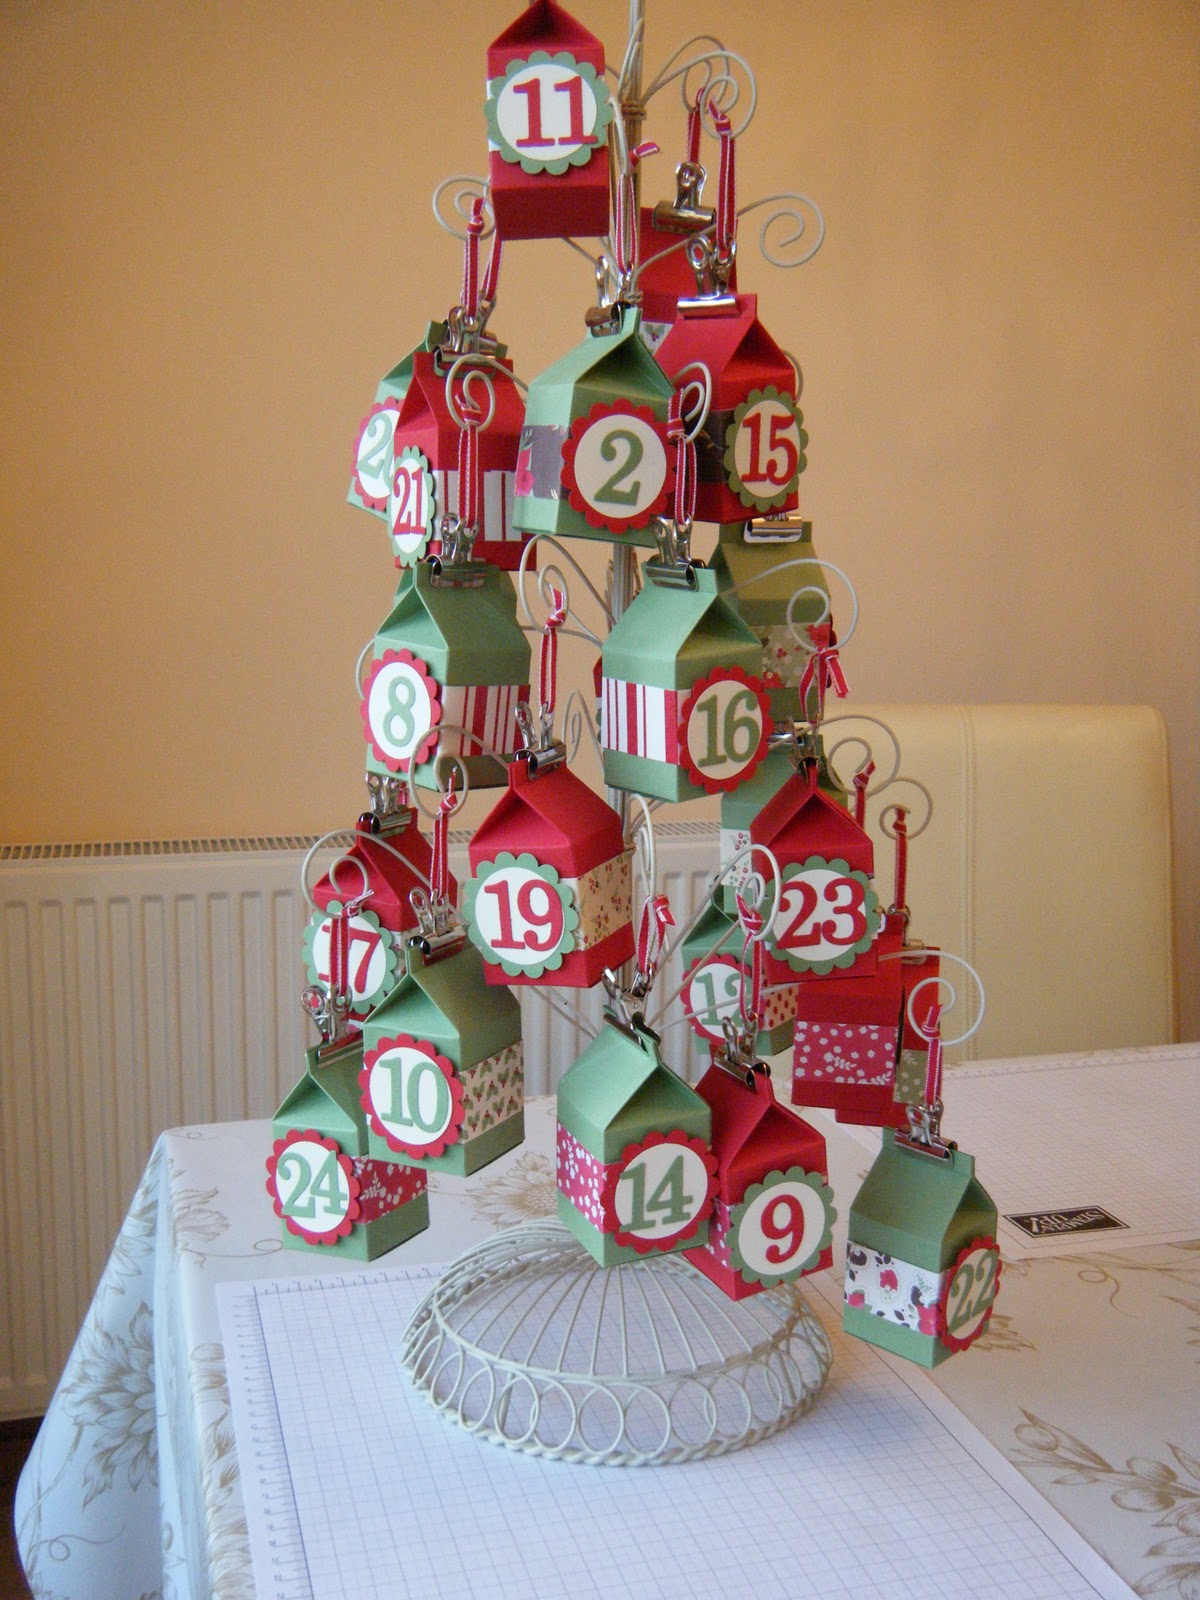
Today I wanted to share this advent calender with you:


I have made 24 mini milk cartons using the Mini Milk Carton die and the Big Shot. I cut them out alternately in Wild Wasabi and Real Red cardstock. I then glued a 1" strip of Holly Berry Bouquet designer paper around it and cut a scalloped circle using the Scallop Circle Punch and a Very Vanilla circle using the 1 3/8" circle punch.


The numbers were cut using the Timeless Type Junior Alphabet Sizzlets dies and the Big Shot. The circles were fastened to the mini milk carton with a Dimensional.

A clip was fastened to each carton and a piece of Real Red 1/8" Taffeta ribbon was threaded through.


I happened to have a stand that I could use but, as not everyone has this, I've also hung it from some twigs from the garden.

The boxes can be filled with anything you want (as long as it's small enough) eg sweets, chocolates, small toys like erasers, jewelry, hair slides etc. The calender can be used again and again as long as it's packed away carefully as opening the boxes does not damage them.


If you would like to make one of these, contact me to buy the supplies, or if you prefer not to buy the products, I have these available as kits. The kit includes everything except for the glue. Cost is £15.00 if collected from me, or £17.00 if it needs to be posted.

Wednesday, 5 October 2011

Fair goodies

Hi all, as promised, here are some of the things I made for the Octoberfest event I went to on Saturday. Not all of the products used are Stampin' Up! but most of them are.


Here are some Gift Card holders made using the Flight of the Butterfly stampset:


Some Candy Corn Halloween sweety bags, using the Top Note Die to make the topper:


A collection of some of the items I made:


Here is one of the Post-it Note Holders, using the Daisy Big Shot die. These were very popular and soon sold out. Luckily I still had this one at home so I could take a picture:


And a close up of the pencil boxes with erasers. This isn't a great picture as the light is reflecting off the plastic bag (that's what happens when you leave your husband to take the photos) I would have taken them out of the bag. People really liked these for children's party bags and I'm busy making 35 of these for someone.


Lastly, some gift boxes using the Mini Milk Carton Big Shot die. I filled some of them with bubble gum and stamped one of the images from the Every Little Bit stamp set, on the tag.


If you fancy having a go at making some of these things yoursefl, then why not join us in the cardmaking classes, held every second Wednesday - for details see the classes tab at the top of the blog.

If you're not sure you it's for you, then come along to the new catalogue launch party on Saturday 15th October. You get to keep a copy of the new catalogue, make 2 projects and have a play. All this for only £5. Contact me if you would like to book your place, so I can make sure I have enough kits made up. Hope to see you soon. x

Monday, 12 September 2011

Christmas in September

Hi Everyone, I know some of you have been wanting to see photos of the Christmas class which is happening on Wednesday. Unfortunately the class is now full but I am planning to hold an all day Christmas class in November, so check back for final details. I’m hoping to finalise the arrangements this week.
This is what we’ll be making on Wednesday:

The gorgeous Jolly Holiday papers are retiring in September and they are actually sold out now. Luckily I had enough for the class. However, you can make these cards just as easily with the new Christmas papers coming out on 1st October. They are lovely, so check back on the 1st October when I’ll post a link to the new catalogue, or order your copy now – see the button on the side bar.

Here are some close-ups of the cards. The stamp set Contempto Christmas is only £15.95 for the wooden set or £12.95 for the clear set. It’s a very versatile set and has a matching Ornament punch so making cards, gift boxes, tags and all sorts of decorations couldn’t be easier.


The Christmas tree branch was stamped with the Lovely as a Tree stampset and here you can see the 3D effect of the baubles after I punched them out with the ornament punch.

Here's the next one. I used the Vintage Wallpaper embossing folder on the background after I cut it with My Big Shot, using the Top Note die.


Here are some close ups of the embossing done with the Vintage Wallpaper folder.


I used the fabulous mini milk carton die in the Big Shot to make this cute little container. These make great gift boxes or can be filled with sweets, chocolates etc. I love these and they are so easy so we'll probably making lots of these in future projects.


I used the 5 petal Flower Punch to make the poinsettia.


If you want to make any of these projects yourself, contact me for the supplies you need or join me in another Christmas class later in the year. Take care. x
Posted by Picasa
Supplies used:
Cardstock: Old Olive, Cherry Cobbler, Very Vanilla
Papers: Jolly Holiday
Stamp sets: Lovely as a Tree, Contempto Christmas
Punches: Ornament punch, Modern Label, 5 Petal Flower, Oval Scallop
Other: Big Shot, Top Note die, Mini Milk Carton die, Vintage Wallpaper embossing folder