Friday, 11 November 2011

Advent calender kit

Apologies (again) for having not blogged for a while. This is my first Stampin' Up! Christmas and I can't believe how hectic it is. There seem to be so many Fairs to go to, as well as classes and parties. Not that I'm complaining mind you, it's good to be out there spreading the Stamping word...

Today I wanted to share this advent calender with you:


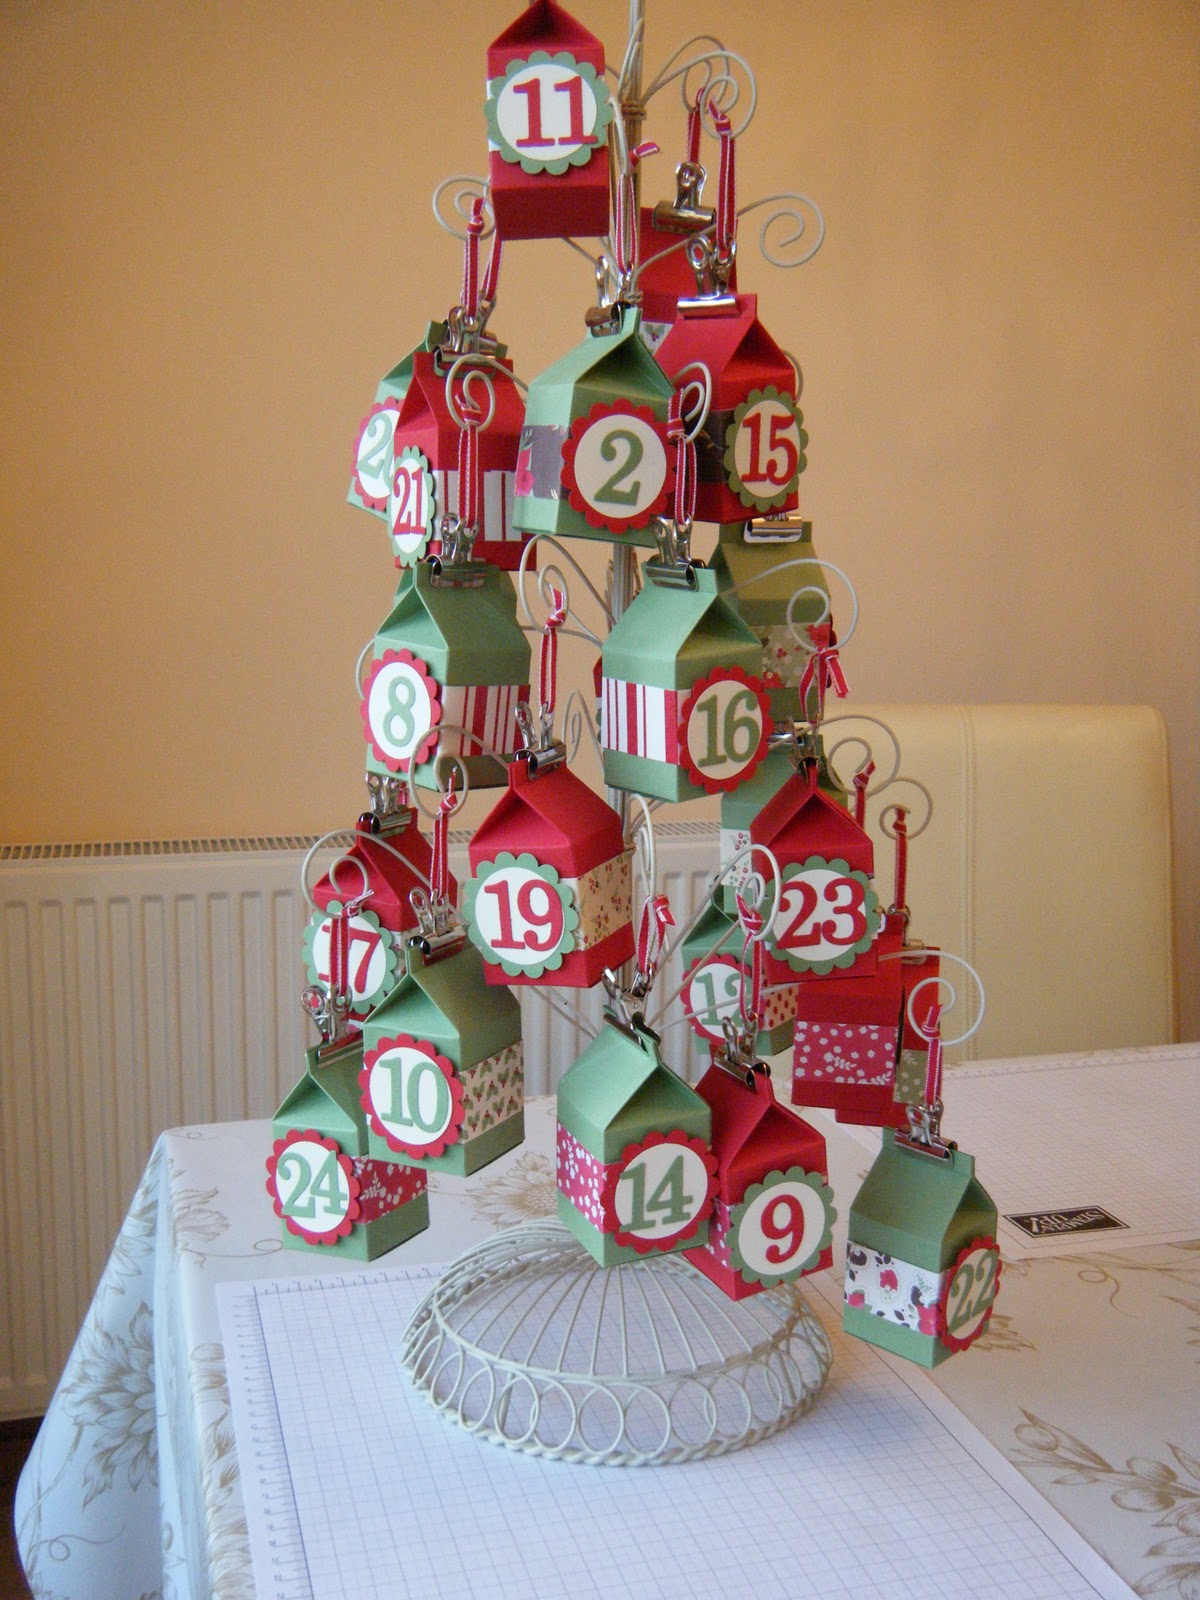
I have made 24 mini milk cartons using the Mini Milk Carton die and the Big Shot. I cut them out alternately in Wild Wasabi and Real Red cardstock. I then glued a 1" strip of Holly Berry Bouquet designer paper around it and cut a scalloped circle using the Scallop Circle Punch and a Very Vanilla circle using the 1 3/8" circle punch.


The numbers were cut using the Timeless Type Junior Alphabet Sizzlets dies and the Big Shot. The circles were fastened to the mini milk carton with a Dimensional.

A clip was fastened to each carton and a piece of Real Red 1/8" Taffeta ribbon was threaded through.


I happened to have a stand that I could use but, as not everyone has this, I've also hung it from some twigs from the garden.

The boxes can be filled with anything you want (as long as it's small enough) eg sweets, chocolates, small toys like erasers, jewelry, hair slides etc. The calender can be used again and again as long as it's packed away carefully as opening the boxes does not damage them.


If you would like to make one of these, contact me to buy the supplies, or if you prefer not to buy the products, I have these available as kits. The kit includes everything except for the glue. Cost is £15.00 if collected from me, or £17.00 if it needs to be posted.

Monday, 31 October 2011

Delicate Doilies

Hi Everyone, I'm doing a workshop on Wednesday for my good friend Heather so yesterday I was preparing what I'm going to demo. I've had the Delicate Doilies stamp set since September when I got the chance to pre-order in preparation for the new catalogue launch. Although I've had it all this time, and the Flirtatious papers that match the stamps, I've not had a play until now. So this is what I created:


These are just a few quick mini cards that can be used for any occasion. I used Wisteria Wonder, Pool Party and Whisper White cardstock plus the matching inks. I also used the fabulous new Doily Triple Layer Punch and the 1 3/4" circle punch.
 And once I got started, I couldn't stop. I created lots of the same design card in different colourways to show the potential of this stamp set. Here you go:


The combinations I used are: Wisteria Wonder/Pool Party; Certainly Celery/Wild Wasabi; Crumb Cake/ Soft Suede; Melon Mambo/Daffodil Delight; Calypso Coral/Peach Parfait; Not Quite Navy/Cherry Cobbler.

Then I thought, wouldn't this be a great way to show people the potential of stamp sets when I do workshops? Often there isn't space to put up display boards, so this is a great way to circulate samples. I've tied it all together by cutting a Top Note on the Big Shot in Pool Party and used the gorgeous new in-colour Ruffled Ribbon to make my bow.


I'm now planning to do this for all the stamp sets I have, showing their potential. I'll show you the others as I do them.

Now then, back to Wednesday's workshop. I'm also making Heather a box in a bag to keep the cards in. I'll show you the finished article after the workshop - that is if I remember to take a photo as Heather will be getting the set as a hostess thank you gift, for hosting the party. If you would like to receive something similar and have the chance to earn free goodies out of the catalogue, contact me to host your own worshop/party.

If you would like to have the chance to make your own projects, using Delicate Doilies then join us at the next cardmaking class on November 9th.

See you soon. x

Sunday, 30 October 2011

All day Christmas Class 12th Nov - more pictures

Hi all, at long last here are some more pictures of the all day Christmas class. I have finalised the details and we will be making these:


Not forgetting the Santa and Rudolph gift boxes, I showed you before. So, to sum up we will be making:
A banner
2 banner cards
2 Dasher cards
A Dasher gift card holder
Santa and Rudolph gift boxes

Here's a collage of all of it. The colours look a bit dark in the photo but are lovely in real life:


Remember you get plenty of stash to make all the projects plus plenty to take home. These projects have been inspired by the work of 2 very talented demonstrators - Monica Gale and Jenny Moors - check out their blogs for more inspiration.
If you fancy having a go at making these projects,then contact me ASAP. I've extended the booking deadline to November 2nd so let me know if you are interested. Hope to see you on the 12th. x


Thursday, 27 October 2011

All Day Christmas Class 12th November

Hi everyone, I know I've been taking about the All Day Christmas class for ages but I thought it was time to show you a few of the things we'll be making. These are gift boxes which double-up as Christmas tree decorations. They are great fun to make, so come and have a go.

Here's Santa:


Rudolph:


You get to play with the Big Shot, the dies and the embossing folders so what are you waiting for? Ofcourse, these aren't the only things we'll be making. We'll also make a variety of cards and some other fun projects. I'll show you some more sneak peaks later.

Remember the cost is only £30 for all the materials needed (except glues). You do need to book and pay before the 31st October, so don't hesitate. You can contact me on 07970 708348 or mapleleafstampin@yahoo.co.uk.  I hope to hear from you soon. x
Posted by Picasa

Monday, 24 October 2011

Ladybay Craft Fair

Good morning all. I had a stall at the Ladybay Craft Fair on Saturday. We had a good time although it was pretty quiet. Here's a picture of the stall with all the stuff I'd made. The smaller table had some of the projects we've made in card making classes.

Because it was quiet I had time to make some more pencil boxes, which is what I'm doing in the picture.

We had a price draw and the lucky winner of the Pot Pourri stamp set was:

Jenny W

Jenny, I'll email you so I can send you your prize.

Quite a lot of people were interested in the All Day Christmas class which is taking place on Saturday 12th November. If you want tocome along, then please book your place ASAP because I will need to order the products. The class cost is only £30 and we will be making lots of projects. I did have some samples but someone wanted to buy them and I couldn't say no. Keep an eye on my blog and the full range of samples will soon appear. I hope you can make it. x

            Posted by Picasa

Sunday, 23 October 2011

Last of the Pennant Parade cards

Good evening everyone. I thought I would show you the last of the Pennant Parade cards which we made in card class. So much has happened since then, I'd almost forgotten about these. This is my favourite of the set. I made it as a congratulations card but it's also lovely as a baby card.


We used So Saffron and Whisper White card and So Saffron and Certain Celery ink. The Pennant punch was used to punch the shapes and one of the Itty Bitty Punches for the small flowers.

A rhinestone sparkly in the middle of each flower and a sentiment from the Curly Cute stamp set completed the card.


Posted by PicasaAnd finally, the Icecream Cone card:


For this card we used Pretty in Pink cut with the Scallop Circle die using the Big Shot. We then embossed it with the Polka Dot embossing folder. The icecream cone was stamped using the Pennant Parade stampset and Daffodil Delight ink and punched out using the Pennant Punch. The icecream scoops were cut using the scallop circle punch and scraps of designer paper.


The little 'star' stamped for the background is part of the Pennant Parade stamp set. Once again the sentiment is from Curly Cute. I love this set and use it all the time, as you can tell.
I hope these cards have shown you how versatile this set is. Let me know if you want to order anything. x

Wednesday, 19 October 2011

Diaries and Notebooks class 26th October


Hi everyone, Just a quick post today showing you what we'll making in the Diaries and Notebooks class on the 26th October. I have used the Beau Chateau papers which are gorgeous. They use Marina Mist, Pink Pirouette, Soft Suede and very Vanilla as their colours, so I decided to decorate my diary in Marina Mist and my notebook in Pink Pirouette.

The photos aren't great because it's always dark now, when I take the photos - either early morning or in the evening, so it's all artificial light now. I'll have to start photoshopping them, I think.
Here's a closer look at the diary. I realised I haven't stuck '2012' on yet, so it looks a bit bare in the corner and I think I may decorate the band with a rosette to give it a bit more 'body' but you can decorate yours however you wish. This is an A5, week to-a-view diary which is included in the class price.


.


A closer look at the designer papers. I used the Eyelet border punch on mine. 


And here's a close up of the butterflies, stamped with Marina Ink mist and decorated with a Rhinestone. The stampset that I have used for all the stamping is called Creative Elements. It's lovely and very versatile. It includes the background stamp, border, butterfly and more.

Now for the notebook - again it's A5 size.


Some close ups of the detail. The letter is from the Broadsheet Alphabet and the frame is from the Four Frames stamp set and punched with the Decorative label punch. The flower is part of the Creative Elements set

And, a closer look at the designer papers. These are from the same Beau Chateau set but these are the pink ones. You will get some of each in the class, so you can use them how you like.

I usually much prefer blues to pink which is why I did my diary in blue, but I must admit I do really like the pink notebook. I've kept everything on the diary and notebook very flat, and have made sure all the edges are stuck down really well. This is because I use my diary for work and it's in and out of my bag all day long. If you tend to leave your diary on your desk or at home, you could really build up some of the images. It's all up to you.

If you would like to order any of these products, and/or join us for the class, please contact me ASAP. There are only 2 spaces left. Further details are on the 'classes' tab, at the top of the blog. Hope to see you soon. x