Tuesday, 31 May 2011

Something an 'Itty Bitty' different

Hi everyone. Today's cards have been made with the Itty Bitty Bits stamp set, (£11.95 wood, £9.95 clear). Demonstartors were given this set at the regional training events earlier this year and I've been meaning to have a play ever since. The set consists of 9 little stamps which are great for creating cards like the ones in this post, or you can create fabulous backgrounds with them. Here are my cards. They are 3" x 3" to give you an idea of size.


I used Melon Mambo, Concorde Crush and Pretty in Pink cardstock with matching inks. There is an Itty Bitty Punch pack, £15.50 for 3 punches, that match the shapes of the stamps. I've used them to punch the shapes on the cards, in the different colours. There are also matching clear buttons which are great value at £4.25 for 64 buttons, but I forgot to use them ....


Here's one of the others in a different colour:


Hopefully you get the gist. I must apologise for the blue tint on these photos, yet again. One day I'll get it right. Good job you're not reading this blog to get photography tips. Anyway, this is a great fun stamp set so if you fancy having a go, contact me to place an order.. Have fun. x


Saturday, 28 May 2011

Masculine Cards Class now fully booked

Just a quick post to let you know that the card class on June 8th is now fully booked. The next class is a scrapbooking class on June 22nd. Keep a look out on my blog for some previews. If you would like more details on any of my classes, please have a look at the separate page - click on the tab at the top of my blog. Back soon with some pictures. x

Thursday, 26 May 2011

Plane and Simple

We made this card at team training recently and. when I needed a masculine card in a hurry yesterday afternoon, as I was rushing out the door to yet another leaving do, this is the card I grabbed. 


Oh no, I've just looked at this picture and realise it says 'happy birthday' but the person leaving is taking voluntary redundancy! That's what happens when you've had a long day at work, and you're rushing out. Oh well, he won't mind.

Anyway, back to the card. I used Crumb Cake, Always Artichoke and Very Vanilla cardstock. The vanilla card was stamped with Always Artichoke ink using the Plane & Simple stamp set, and embossed in the Big Shot using the Square Lattice embossing folder. I used the Spiral Border punch to create the edge - this punch is great for masculine cards or when you don't want the edge to be too 'fancy'. I didn't think I liked this, until I used it and mine is now on order.
Here's a close up, showing the Lattice embossing detail.


I also added a button from the Vintage Springtime buttons which is in the mini catalogue. It was tied with some linen thread and the next photo shows it in detail. The designer paper is from the Vintage Springtime designer papers. These papers may seem very floral but they do also have some more subtle patterns, including this lovely green stripe.


Hope you like this card. Contact me re my class on June 8th if you would like a play with this stamp set and some of these products. x

Wednesday, 25 May 2011

Masculine Card Classes

Hi all, a very quick post this morning before I go to work. I did promise a sneak preview of my card class on June 8th but my camera battery was flat yesterday, and we couldn't find the charger! It was found eventually but it was too dark to take photos so I've had a quick go this morning.

If you would like to attend this class, please contact me before friday 27th May, so I can order the products.

Here's a sneaky look:


We will be making a card, a gift bag and a gift card holder. Another look:


We will be using the Big Shot and embossing folders, heat embossing, the Plane and Simple stamp set and many other techniques, and generally having fun.

One last picture and then I'm off to work. Hope to hear from you soon as there are only a couple of places left. Have a good day. x

Sunday, 22 May 2011

Another Daisy Card

I've not had much time to do any crafting this week, so I'm going to show you a card I made a while ago, using the Big Shot and my favourite die, the Daisy # 2 Bigz die.

This is a very similar card to the yellow and white daisy cards I posted a couple of weeks ago, but it actually looks completely different because of the different colours used.

Here it is:


I used basic black, melon mambo and daffodil delight cardstock. The leaves were punched in certain  celery card, using the 2 step bird punch. The greeting is from the free hostess level one stamp set Afterthoughts. This set contains some fantastic greetings but can only be earned by having a workshop at home or by joining my Hostess 10 club. Contact me for further details, if you would like to know more.


I covered the centre circle with Crystal Effects and then covered it in glitter. The greeting was stamped using Versamark ink and then covered with pink embossing powder and heat embossed. The ribbon was from my stash but matched nicely. Another view:


I hope you've enjoyed today's card and it's maybe inspired you to try the same products but in different colours. Hopefully I'll have more time to blog this week, so keep checking. x


Monday, 16 May 2011

Strength & Hope

Hi everyone. I had a great time at Team Jelly's first quarterly training on saturday. We made some great projects and I met some lovely fellow demos. If you would like to have a chat about becoming a demo, let me know. It's great fun and you get discount and can make money too.

Unfortunately my camera battery was flat, and so was the spare, so I couldn't take any photos. We've managed to 'misplace' the camera charger so I can't even take pictures of the projects I made! So, I'll have to post them at a later date.

For now, I'll show you a card made with the Strength and Hope set. For every one of these sets sold, Stampin Up will donate £1 to The Breast Cancer Research Foundation.

This set is beautiful. It is a bit like the Bliss set which was a free Sale-a-bration set which is no longer available. So if you missed out on getting Bliss, you'll probably like this one and you'll be helping a very worthy cause.


I used Elegant Eggplant, Crumbcake and Very Vanilla cardstock. I used Crumbcake ink to stamp the background and the butterflies were first inked with Perfect Plum and I then used the Elegant Eggplant marker to go over the outside edge and to add detail to the middle of the butterfly. You can see it better here:


The Top Note exclusive Stampin Up die was used to cut the shape behind the butterflies. The butterflies were stamped onto the background and then stamped again on a spare piece of Very Vanilla cardstock and stuck on top of the stamped butterflies, using dimensionals. This prevents any problems cutting out the delicate antenae. Here's another view:


I hope you like this. If you would like to buy this set and contribute to Breast Cancer Research, please contact me to place an order. x

Friday, 13 May 2011

Birthday Daisies

Hi all, I was all set to post this yesterday and then found that Blogger was down! Typical. Still I'm here now. Two friends of mine had birthdays this week and, as they don't know eachother, I made them very similar cards.  Here's one:

And here's the other:


I have completely fallen in love with the Flower Daisies #2 die. It makes the most gorgeous flowers which you can use on cards or you can put them in a vase. Like this:


Here are some close ups:


For the cards I used Whisper White and Daffodil Delight cardstock. I used Whisper White satin ribbon and I heat embossed the greeting with white embossing powder. The greetings are from the Level one hostess set Afterthoughts.


TIP:I don't always want to use the bottom part of the greeting, so I cover it with sellotape when inking my stamp, and then I remove the sellotape before stamping. That way no ink gets on the parts of the stamp I don't want to use.


For the flowers I also used Pumpkin Pie cardstock.


Here all of them together:


I hope you enjoy these projects. If you would like to order the Flower Daisies #2 die (114520, £16.95), please contact me. If you would like to make some flowers at a home workshop, I would be happy to book a party with you.

I've got a whole day at a team training event tomorrow which I'm really looking foward to. I'll no doubt have lots of projects to show you at a later date. See you soon.x

Tuesday, 10 May 2011

Blog News

Hi, well I may finally be getting the hang of this blogging business. I have added some information on separate pages at the top of my blog. This tells you about my classes, special offers and how you can spread the cost but still get lots of benefits. Have a look and contact me if you want to order or book anything.

You don't just want to hear about my IT skills though, so here's a quick card for the men. Talking of masculine cards, don't forget my class on June 8th using the Plane and Simple set.

This card was made using the Lovely as a Tree stamp set. I love this set as it can be used for lots of occassions, just by changing the sentiment.


The photo quality is not great but I used Whisper White, Soft Suede and Old Olive cardstock; Old Olive ink and my favourite Scallop Trim Border punch. The ribbon was my own and the greeting is from the Sale-a-Bration set So Happy for You, which is sadly no longer available .

I did make a matching candle but I haven't got a photo of it yet, so I'll post that later. x

Sunday, 8 May 2011

Wedding Acceptance

Hi everyone,

 I wouldn't want you to think I'll be posting everyday but seeing how's it's the weekend and I have some time on my hands, I thought I should post something while I can.

We have been invited to a wedding in June - actually my husband is going to be the best man, so they definitely know we will be there, but I couldn't pass up the chance to make an acceptance card. I actually made 2 so I could put one on my samples board, and send one. I know the bridesmaid will be in a burgundy type colour, so the card I sent was made in Cherry Cobbler.

This version was made in Rich Razzleberry. I didn't have a stamp that said 'Acceptance', so I printed it on my computer. This was the result:


I used the stamp set Baroque Motifs which is extremely versatile. I stamped the swirl in Crumb Cake ink on Whisper White, and the small flower, using Rich Razzleberry ink. I used the Four Frames set and Decorative Label punch to create the Acceptance label.

The card was finished with some lush Razzleberry satin ribbon and a brad from the Hodgepodge Hardware set. This set may seem expense but it contains 100 lovely metal frames and brads, not counting the 100 small silver brads, and it lasts for a very, very long time.


I'm not sure why the brad has a pink tint to it. You can get this effect by covering it in ink and then wiping the ink away, which just leaves the colour in the indentations. I don't remember doing that for this card, but then there are quite a few things I don't remember....

Anyway, I hope you enjoyed today's card. Check back again soon. Sandrina x


Saturday, 7 May 2011

Post-it Note Holder

Hi Everyone, despite all my best intentions, I  haven't exactely put many posts on my blog this week. I have, however, done a fair amount of crafting this week. All I need now is some time to take the photos!

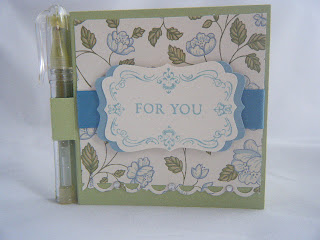
I spent a lovely afternoon on tuesday with some crafty ladies in Bingham. We all made a post-it note holder as the Make & Take and I certainly enjoyed it. Thank you ladies.

This is what we made:


I used Springtime Vintage designer paper, Certainly Celery and Baha Breeze cardstock. Some Marina Mist ribbon and a few  Basic Rhinestones placed on the edge which was made with the Scallop Trim border punch. The stamp set is Four Frames and the punch is the Decorative Label punch.

Here's a better view of the edge and the bling:


If you want the chance to make these with your friends, please contact me to book a home workshop.

Have a good weekend. x