Thursday, 22 December 2011

Santa Tags

Hi everyone, this is probably my last Christmas project post for this year. I hope you're all ready for Christmas - food bought, presents bought and wrapped, so you can now sit back and chill (and maybe craft a bit). We had a secret santa at work this week and it was very secret. We all used the same wrapping paper and I made the tags for everyone. Luckily I had attended a demo event the day before, run by my upline Victoria, and she had just come back from the Stampin' Up convention in Paris. While she was there she was given one of these Santa tags as a swap. It was just what I needed, so I set about making some:

 
He's made using a variety of punches. I could let you guess which punches were used but that's a bit unfair so here you go:
Hat - Pennant Builder; Bobble on hat - Boho Blossom punch, Hair around face - scallop oval; Face - Oval; Nose - Itty Bitty punch pack; Eyes - Owl punch; Beard - Ornament punch; Moustache - Bird punch.
This sounds like a lot of punches but you could make some changes if you needed/wanted to.


I used a white pen to highlight his eyes and nose and in real life he looked really cute. Most people saved him, to take home.

I hope you all have a fantastic Christmas and remember to check back after Chrstmas for new projects and class information. Have a great time. xx
Posted by Picasa

Wednesday, 21 December 2011

Serene Snowflakes

Hi everyone, I just wanted to share these Serene Snowflake cards with you:


These were very quick and easy to make. I took a 12"x12" sheet of Whisper White and stamped it all over using the Serene Snowflakes stampset and Pool Party, Island Indigo and Not Quite Navy ink. I then cut them into 3" squares.


The card base is 4" square and either Pool Party or Indigo Island card stock. The layer is  3 1/4" square. By using these measurements you can get a lot of cards out of a 12"x12" sheet. Once I had stamped my snowflakes in ink, I stamped some snowflakes in Versamark and sprinkled Heat 'n Stick powder over them, heated it and then covered the snowflake with Dazzling Diamonds glitter and heats set it. This is the same method as I used for the Polar Party cards in my previous post. Here is a close up where I'm attempting to show you the glitter snowflake:


Here's another one. Again, it's difficult to show you the full effect in these photos. I added a few rhinestones in the centre of some of the snowflakes for the finishing touch:

 
The sentiment is from the Polar Party stampset. This is one of the final cards:
Posted by Picasa

I hope you like these cards. This technique of random stamping can be used with lots of stampsets, not just snowflakes so why don't you have a go? I've got some really cute Santa tags to show you next time, made with punches and then I guess it will be Christmas and we'll be moving on to other projects - and the new mini catalogue. Remember to check back for the Santa tags. x

Tuesday, 20 December 2011

Polar Party Cards - at last!

Hi everyone, I know, I'm rubbish at blogging. I keep promising things and then it takes ages for me to do it. No excuses, but here, at long last are the photos from the last card class. We used the Polar Party stampset and I just love it. This stampset has cute images which you can combine to make your own little scenes as I did for the penguin card:

The photos aren't great as light is hard to come by at the moment (!) but I'll show you lots of photos so you get the idea. The images were stamped with Stazon ink and then coloured using the ink pads and blender pens. I have to confess to finding colouring images on Whisper White cardstock quite hard, but the blender pens solved all my problems. To do this you can either scribble a marker pen onto a plate or other hard surface or you can squeeze the ink pad while still closed, so it picks up some of the ink in the lid. You then use the blender pen to pick up the ink and colour. You can make the colour as light or dark as you want, so it's great for shading. Here are a couple of close ups:


There is a bit of glitter on these cards but the camera just didn't pick it up. Here is each card on it's own with the details below it:


All cards used Indigo Island as the base card colour. I then used Tangerine Tango paper from the Designer paper stack, layered onto Tangerine Tango card and some orange ribbon that I already had in my stash.


For the tree image I used Old Olive paper and Old Olive card. I didn't have any Old Olive ribbon so I used Pear Pizazz seam binding, which actually worked just as well.


The penguins were combined with Rich Razzleberry card and paper. Again, The ribbon was some that I had in my stash.
The greeting for all the cards is part of the polar party stampset.
Finally, I wanted to have a go at something I had seen on Monica Gales' blog. She covered a coloured image with Versamark ink and then with Heat 'n Stick powder. You melt the powder, using a heat gun and then cover the whole image with Dazzling Diamonds glitter. Heat it again and you end up with a fabulous glittered panel but the glitter does not come off as it has been 'heat set'.
I (foolishly) showed the ladies in my class the final result and ofcourse they all wanted to do this then. Much, much glitter later - all over us and the dining room, they all had beautiful, glittered cards and all were amazed at the results.


You really cannot get the full effect in a photo. It sparkles in beautiful colours in real life but hopefully you're getting some idea. If you fancy having a go, let me know. I can arrange a home workshop and demonstrate the technique. If you want to buy any of the products, just get in touch. You can make these cards for next year (it's probably a bit late for this year), and amaze all your family and friends.
I will be back with some more Christmas ideas before Christmas, so keep looking. x


Posted by Picasa


Wednesday, 14 December 2011

Santa gift box

Hi everyone. Sorry for the delay in posting the things we made at our last card class. I've not been well, but now feel a bit better so can go on my computer again. This is the santa gift box we made. I love this. Such a clever idea (not mine, I saw various versions on the internet). I'm sure we'll make it again though, using different colours and papers. Here you go:


Believe it or not the box is made from the Mini Milk Carton die, using the Big Shot to cut it. If you google 'mini milk carton box' and click on 'video' then you'll get several youtube videos showing you how to put it together. That will be much easier than me trying to explain it. I used Real Red cardstock for the box and a 1" strip of Basic Black for santa's belt. I cut 1" from the end of the belt to place in the middle of the silver square. The silver square was punched using the 1 1/4" square punch. A couple of pearls act as buttons.
I punched holes in the top 'pleats' using my Crop-a-dile, and threaded 1/8 Real Red Taffeta Ribbon through the holes. Hopefully you can see how I did it here:


As you can see the white ruffle was made using Whisper White card and the new Dotted Scallop Ribbon Border punch. Everybody in the class did a great job of making the box. If you fancy having a go and need any of the products, just let me know.

The Christmas cards will be posted soon, promise. keep checking. x
Posted by Picasa

Friday, 9 December 2011

Patchwork card

Hi everyone, I made this card as I thought we could maybe do it in card class yesterday. After I had made it, I felt it didn't fit with the rest of the projects, so we didn't do it. Still, I thought I would show it to you all, especially as it's a great way to use up scraps of paper.
I used Wild Wasabi and Real Red card stock. I used the square punch to punch squares in Holly Berry Bouquet designer paper and stuck them on some paper. I then used the Big Shot and Top Note die and cut one shape out of my patchwork piece and one out of Real Red. The poinsettia is made using the 5 petal flower punch anf the leaves were punched using the Bird punch.


The sentiment is from the Polar Party stamp set. This is the set we actually did use for the class and I will post the cards we made later. There are a few small stamps in the Polar party set and I used them to stamp the background on the base card, and to decorate the sentiment panel.

Posted by PicasaI hope you liked this card. I'll show you the santa gift box we made, next time. x

Tuesday, 6 December 2011

Thinking of You

Good morning everyone. Today I'm sharing a card which I made for a friend who lost someone close to her family. I didn't want to do a traditional Sympathy card, so did this instead. I must apologise for the poor quality of my photos lately. I constantly end up taking these photos either early in the morning or in the evening and it's always dark outside!

The colours on this card are actually Concorde Crush and Basic Gray. You can see it better in the last couple of photos. The Basic Gray panel is from a discontinued designer paper but plain Basic Gray would work just as well.


I used my favourite Creative Elements stamp set for the background swirl, stamped in Concorde Crush ink and I used the Beautiful Wings Embosslits die and Big Shot, to cut the butterflies. I added a few pearls - you can see them better in the close up below:


As before, I stamped the inside with the butterfly from the Creative Elements stamp set and, in this photo you can finally see that the card is actually the deep purple of Concorde Crush. I used my trusty Curly Cute stamp set to stamp the sentiments and the Scallop Trim border punch to create the edging.


I was really pleased with how this card turned out. Just such a shame that it was for a sad occassion. See you soon.

Sunday, 4 December 2011

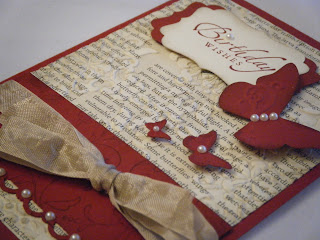
Vintage Birthday Greetings

Good morning everyone. A birthday card from me today. I have finally got round to using my Beautiful Wings Embosslits die. I have had this die for a while but just haven't had time to use it. Now that I have though, I have fallen in love with it. This die cuts the most beautiful, dainty little butterflies and embosses them, at the same time. This die is not to be confused with the Beautiful Butterflies die, which cuts larger butterflies which can actually be used to make a card base.


I used Cherry Cobbler for my base card and First Edition speciality papers for the panel on top. These papers are great value as you get 24 sheets instead of 12, so double the amount for your money. I ran the First Edition panel through the Vintage Wallpaper embossing folder and the Big Shot, after I had inked the embossing folder with Crumb Cake ink. It is difficult to see in the picture but it makes the background of the panel a nice 'crumb cake' colour while the raised embossed pattern remains vanilla. I stamped a strip of Cherry Cobbler with the background stamp from the Creative Elements stamp set, and edged it using the Scallop Trim Border punch.

I then used the Sincere Salutations stamp set for the greeting and the Decorative Label punch to cut it out and to create the Cherry Cobbler border.

I added some Pearls and the wonderful Crumb Cake Seam binding to give it the finishing touch. Everything was sponged with either Crumb Cake or Cherry Cobbler ink to give it a bit of definition round the edges and I scrunched the ribbon to give it a 'vintage' feel.


I stamped the inside with my favourite butterfly from the Creative Elements set and used the Scallop Trim Border punch again.
I made this for a colleague at work and she was very pleased with the result. Check back soon for another card made with the Beautiful Wings Embosslits die. x

Thursday, 1 December 2011

Doilies class round-up

I know I've shown you some of these cards before but here, for the final time, is what we actually made in card class. Everyone worked really hard and managed to complete three A5 cards and three 3"x3" cards. Sometimes a little cute card is all you need.  These are the A5 cards:

We used Pool Party and Wisteria Wonder cardstock and inks, plus Whisper White. We used the Delicate Doilies stamp set and the Curly Cute stamp set for the greetings. (except for the 'celebrate' which is from a discontinued set). We also used the Perfect Pennants die and the Big Shot to make the lovely lacey circles in the middle of these cards. Some of the new, gorgeous, ruffled ribbon in Pool Party completed the look. The other punches we used were the Doily Triple Layer punch (this is like having 3 punches in 1), the 1 3/4" circle punch and the Modern label punch. Here are the small cards which you have seen before:

The next card class is on the 7th december, 7.00-9.30pm at my house. We will be making christmas cards and the cutest little Santa gift box. Sneak peaks will follow soon. If you would like to join us, please email or phone me. Have a good day. x


Wednesday, 30 November 2011

A Paisley Get Well

Hi everyone, I wanted to share this Get Well card with you. I made this for one of my regular card class ladies, who has been feeling under the weather recently.


I made this card using the Paisley Petal Designer papers. I love these papers. the colours are so rich and there are lots of different colours in the papers, so you can choose your own favourites for the base card and detail. There is also a matching Paisley Petals stamp set, but I haven't used it on this card.

I used Always Artichoke for my base card and Marina Mist for the ribbon and the card behind the greeting, which was stamped with the Sincere Salutations stamp set and punched out with the Decorative Label punch. To get the 'double layered punched effect'  I punched  a label in Marina Mist and then cut it in half. You can then place it behind the stamped label, to give it a coloured base which helps it to stand out.

I used Marina Mist ink, so it all matched, and added a bit of bling in the form of  3 Rhinestones.
 

I also decorated the inside of the card by using the Scallop Trim Border punch on Whisper White card and stamping it with the butterfly from the Creative Elements stamp set. I love this butterfly and you will see it on some cards soon.


I hope you liked today's card. I've had a bit of a session so will have more to share with you over the next few days. Hope to see you back soon and remember, if you want any of these goodies for Christmas, contact me before the 7th December. x


Saturday, 26 November 2011

Advent Calender - on a tree

Hi everyone, I have finally been able to buy a small Christmas tree, as they've started appearing in the shops. So, I thought I would show you what the advent calender looks like, on a tree. I actually think it looks much nicer on the tree, than on the stand. What do you think?


Remember, you can buy this advent calender as a kit for just £15. Just contact me. I have been really busy making things for yet more craft fairs, so I don't have any cards to show you at the moment. Instead I thought I'd share some of the fair pictures with you. The quality isn't great as it was quite dark and I was really only taking some quick pictures so that my husband, who is doing a fair for me on his own, would have an idea how to set it up.


Posted by Picasa

This display cabinet shows some of the projects we have made in card classes. If you're interested in joining us, just contact me. There are still some spaces left for Wed 7th December 7.00-9.30pm.


Only 1 fair left to go and then I may have some to craft for myself. Mind you, we have loved the fairs and have met some lovely people. Next year I'll be more organised and we'll make the projects throughout the year. Not just in the last 3 weeks. See you soon. x

Saturday, 12 November 2011

A Fair, a Class and a Postponement

Phew! What a hectic few days I've had. For a variety of reasons I had to postpone the Delicate Doilies class, which should have taken place on the 9th of November. This class will now take place on the 23rd of November 7.00-9.30pm. The cost is £12 as usual and the class will be held at my house. Here is a sample of what we will be making:


Everything is included in the price except adhesives, so come and have some fun. Email me at mapleleafstampin@yahoo.co.uk or phone me on 07970 708348 if you want to join us.

Yesterday I had a stand at a ladies pamper evening in Toton. It was a great evening and I met some lovely ladies. The wine seemed to flow endlessly and everyone seemed to be enjoying themselves. If you are one of the ladies I chatted to, then welcome to my blog. I hope you find some inspiration here.

Lastly, it was the all day Christmas class today. The ladies managed to complete all of the projects within the allocated time, so well done everyone. Everything looked lovely, but as per usual, I forgot to take photos on the day so here are a few you may have seen before:


The cards and banner above were made using Real Red, Old Olive and Very Vanilla cardstock and the Perfect Pennants die and Big Shot.


This is a Gift Card Holder. I have based this on one made by a demo called Monica Gale. Have a look on her blog for details:


I  used Soft Suede, Crumb Cake and Whisper White cardstock and inks and the Serene Snowflakes, Dasher and Tags Til Christmas stampsets.

I hope you have a great weekend. See you soon. x